Pizza has once again become a weekly staple in our house. You see, we had stopped eating it for a time because there are simply no good places to get a good pie around these parts. We have the main pizza chains in the area, but I would hardly characterize what they deliver as food. Furthermore, eating from those places guarantees spending most of the rest of the night in the bathroom. Why pay for that?
Do you have a good pizzeria near you?
Consider yourself lucky if you do. We have a few local places too, but the one we heard good things about we didn't think was much better than Dominoes (that's not a compliment). So after months of absence of pizza we debated one night about ordering delivery but decided against it. Instead, we got a hold of my wife's brother, who apparently makes homemade pizza frequently, and we got his dough recipe. It took a couple of attempts to learn the behavior of the dough, but now I can consistently make an excellent pizza that my wife says measures up to authentic NY pizza (that is a compliment).
I enjoy making and eating my own pizza much more than just ordering delivery. My pizza tastes better to me, gives me no stomach issues, and costs about 1/3 as much to make as it does to have it delivered to my door. But enough about me, bring on the pie!
The dough mixes until it starts to clean the sides of the bowl. Use AP flour if you like a nice thin crust pizza, but if you want your crust to be thicker and doughier then use bread flour.
And that's when you switch to the dough hook and keep adding flour little by little.
Here is the dough when all is finished. It doesn't look like much now, but after it rises a couple of times it will increase in volume.
Here is our dough ball after a couple of risings. I have kneaded the larger bubbles out of it so I can divide it in half.
I was never able to get bread or the pizza dough sliced evenly. My aunt gave me the brilliant idea of weighing the dough after I cut it. Brilliant! It's surprising how much dough makes up 1 oz on the scale. No wonder my breads and crusts have been lopsided!
I place the dough halves on a baking sheet to let them relax and proof just a little bit more. I usually make the sauce and chop up any toppings I'm using while this is doing its thing.
I make my pizza on one of these pizza stones. This simulates a brick oven affect, I guess, I do know that it puts a nice crispy crust on the very bottom of your pizza which is excellent. Before shaping your dough, make sure you have preheated your oven to 500 with the stone in the oven to preheat as well. Once you shape your dough you can't really put it down and go digging for your stone. You have to place the shaped dough directly on the hot stone.
Start by flattening your ball of dough. The dough shouldn't be too elastic. If it is, let it rest a little longer. Flip the dough and flatten some more. I'm left handed, so I may do this backward to you, but I hold my left hand stationary while stretching the dough (gently) with my right hand up and to the right (about 2 o'clock), and then bring the same hand down about a quarter turn clockwise. Spin the dough about a quarter clockwise and then do it again. Do this until you go around the whole pizza at least once.
Now, pick the dough up with your hands and drape it over your two fists (fingers up will put holes in the dough). Stretch gently by moving your fists away from each other.
You don't need to stretch it severely. Let the weight of the dough do most of the pulling. Once you've stretched one section rotate the dough and gently stretch the next section. You'll be able to eyeball when the dough has been stretched enough to fit on your pizza stone.
It takes a little practice to master this, so be patient. You'll be able to see where you've stretched too much and as a result your crust will be weak in those spots. You may even get holes. The trick is to try and handle the dough as little as possible, and be gentle.
You can see here where I over-stretched a little and have a weak spot in the dough. Luckily, with this pie I'm making half no sauce (Lily doesn't like sauce) so the weak spot in the dough won't bother anything.
I find the bottom of a ladle is the best thing to spread sauce with. The technique with sauce is to try not to make racetracks. You want steady, even distribution of sauce.
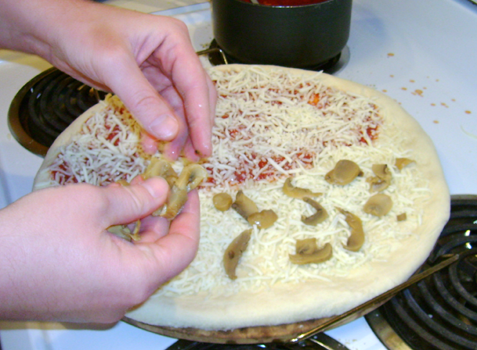
I use shredded mozz that you can get at any grocery store. Do not use finely shredded cheese. It gets too crusty and the texture becomes undesirable. I cheese the outer border first.
Cheese the middle.
This is just about perfect for cheese. It's okay to see sauce (or in this case crust) through the cheese. If you want extra cheese then about another half cup should do. Too much cheese can, well, backfire on you.
Lily likes mushroom on her sauce-less pizza. Jen likes plain cheese. Works for me.
At 500, bake for about 10-12 minutes. At the 10 minute mark I watch the cheese until it gets nice and crispy brown on the top. It's really neat when it comes out. The whole thing breathes and bubbles like it's some kind of molten life form.
Here's the next pie with mushrooms and diced onions.
I've been about some banana peppers lately, so I have some on my half. Although I'll probably leave them alone for a while because these had a very strong vinegar taste.
And our finished pie! This pizza is incredibly inexpensive to make with the cheese costing the most. You can top it with anything you want, try any cheese you want. It's fairly easy and fun to make once you get the hang of it. It's something you can get the kids involved with and excited about. But the most important thing is that the taste is exceptional compared to delivery or frozen, it's not loaded down with oil and preservatives, and it uses all fresh ingredients.
I hope you try this for yourself. It's so worth it.
Homemade Pizza Recipe
Dough Recipe - makes 2 large pizzas
1 tsp active dry yeast
1 1/2 C warm water 110
1 1/2 tsp salt (sea salt if you want, not coarse)
Approx 4 C AP flour
Dissolve yeast in water in mixing bowl for about 10 minutes.
Sift salt and about 2 C of the flour together.
Begin
mixing using the paddle and add flour about 1/2 C at a time. Continue
to add flour slowly until dough begins to clean the sides of the bowl.
When this happens, stop the mixer, clean the dough off the paddle, and
switch to the dough hook.
Begin mixing with dough hook. Add small amounts of flour until the dough is slightly sticky to the touch.
Turn
dough out onto the table and knead a few times. Shape into dough ball
and place in greased bowl (cooking spray works great). Cover with
plastic wrap.
Let dough rise until it doubles about 1 1/2 hours. Punch down and let rise until it doubles in size again.
Now would be a good time to preheat your oven and pizza stone if using one. Preheat 500.
Turn
dough out on table and knead the large air bubbles out. Shape into ball
and slice in half (use a scale to ensure both halves are the same).
Shape each half into a ball and place on a baking sheet with space
between them. Let dough balls rest for a bit until dough has relaxed and
ready to be shaped into pizzas.
While the dough is resting is a good time to make your sauce.
1/2 of my Marinara Sauce recipe is perfect for 2 pizzas.


No comments:
Post a Comment